Settings Reference
This chapter is a complete reference for every option in the Coherence Audio Settings window. Settings are organized into three main sections: Known Devices, Clock Source & Drift Correction, and Workspace.
Opening Settings
Click the Settings icon (gear) in the toolbar, or go to Edit → Settings from the menu bar. The Settings window opens as a separate panel.
Changes take effect immediately unless otherwise noted. Click Save (or close the panel) to persist your settings to the project file.
Known Devices
The Known Devices panel lists every WASAPI audio input device that Coherence Audio has seen in the current or previous sessions. It stores a persistent profile for each device, so your preferred settings are remembered and automatically applied the next time that device is added to a session.
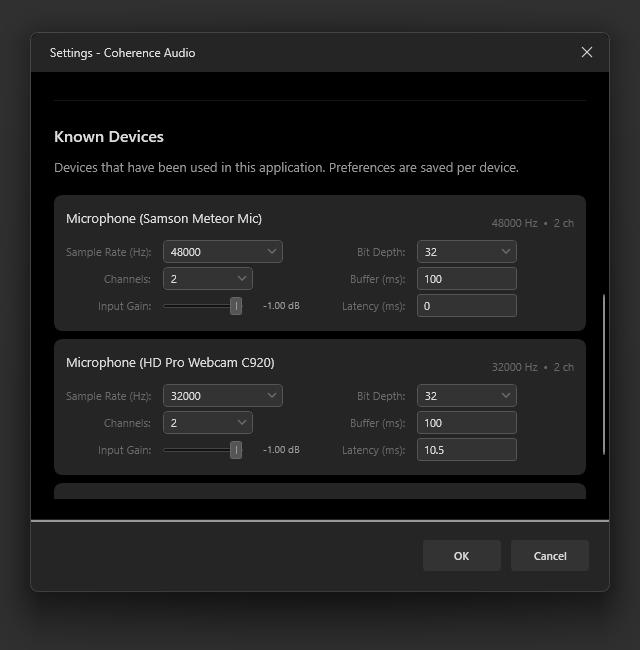
Each row in the Known Devices list represents one device profile. Select a device to view and edit its settings.
Device Name
The name assigned by Windows to the WASAPI endpoint. This is the name shown in the Windows Sound settings and in the Add Track picker. You cannot change this name in Coherence Audio — it is set by the device driver.
Per-Device Settings
Sample Rate
| Setting | Description |
|---|---|
| 44,100 Hz | CD-quality; default for most consumer USB microphones |
| 48,000 Hz | Broadcast/video production standard; default for many prosumer devices |
| 88,200 Hz | Double CD rate; offered by some higher-end devices |
| 96,000 Hz | High-resolution audio; common on professional interfaces |
| 192,000 Hz | Ultra-high resolution; requires device support |
| Up to 384,000 Hz | Specialist use; support depends entirely on the device |
Always match the device’s native rate. Setting a rate the device does not natively support will cause the device driver to apply its own internal sample-rate conversion, which may degrade audio quality and can cause instability on some devices. If you are unsure of a device’s native rate, check the manufacturer’s specifications or leave the setting at the device’s default.
Multi-device sessions: Each device can run at a different sample rate. Coherence Audio handles the divergence gracefully. If you later export with drift correction, all tracks are resampled to the master clock’s timeline (at the master’s sample rate).
Bit Depth
| Setting | Nominal Dynamic Range | Recommended Use |
|---|---|---|
| 16-bit PCM | ~96 dB | Voice, podcasting, casual recording |
| 24-bit PCM | ~144 dB | General-purpose studio recording — recommended default |
| 32-bit PCM | ~192 dB | Maximum precision for demanding post-processing |
| 32-bit Float | Very high (floating-point headroom) | When source levels are uncertain or highly dynamic |
The difference between 16-bit and 24-bit is significant at low signal levels (quiet passages, noise floor). The difference between 24-bit and 32-bit is rarely audible in practice; choose 32-bit PCM or Float if your storage allows and your workflow benefits from it.
Device support: Not all USB audio devices support all bit depths. Most consumer devices support 16-bit only; prosumer and professional devices typically support 16-bit and 24-bit; some support 32-bit float. Coherence Audio will display only the bit depths the device actually reports as supported.
Channels
| Setting | Use When |
|---|---|
| Mono (1 channel) | Single-capsule microphone — use for most USB microphones |
| Stereo (2 channels) | Device has two physical channels (e.g., a stereo USB microphone, a 2-input USB interface) |
Selecting Stereo on a mono microphone wastes storage (doubles the file size) and may result in an empty right channel. Select the setting that matches your device’s physical output.
Buffer Size (ms)
The buffer size is a hint Coherence Audio passes to the Windows WASAPI driver, telling it the preferred capture interval — how frequently Windows should deliver audio packets from the device. The actual interval Windows uses may differ from the hint.
| Buffer Size | Trade-offs |
|---|---|
| 10–50 ms | More frequent deliveries; lower latency |
| 100 ms | Default; suitable for most setups |
| 200–500 ms | Less frequent deliveries; may reduce CPU wake-up overhead on some systems |
Note: This setting controls the WASAPI capture interval hint only. The internal memory ring buffer used to absorb disk-write bursts is fixed at 3 seconds and is not user-configurable. If you experience audio drop-outs, ensure you are recording to a fast local SSD rather than adjusting this setting.
Latency Compensation (ms)
Latency compensation shifts a track’s audio position on the timeline after recording, without affecting the captured content. It is used to correct for a known, fixed delay introduced by a specific device’s driver or hardware.
| Value | Effect |
|---|---|
0 ms |
No adjustment (default) |
Positive value (e.g., 15) |
The track’s clips are moved 15 ms earlier in the timeline — compensating for a device that reports audio 15 ms late |
| Negative value | The track’s clips are moved later — rarely needed, but available for edge cases |
When to use: If you have measured (using a click track, clap track, or impulse measurement) that one device consistently starts audio a fixed number of milliseconds late compared to others, enter that measured offset here. Leave at 0 unless you have a specific, measured reason to change it.
Latency compensation vs. drift correction: Latency compensation handles a fixed, constant offset. Drift correction (Pro) handles a slowly growing offset that accumulates over time. They address different phenomena and can be used together.
Input Gain
The input gain control adjusts the Windows audio endpoint input volume for the device — the same control accessible through Windows Sound settings. The exact behaviour depends on what the device driver does with the value: some devices apply it as hardware analog gain, others as firmware gain, and some as a software volume level. The effect on the recorded signal therefore varies by device and driver.
The slider ranges from −∞ dB (silence) to 0 dB (no change from the current OS level).
| Value | Effect |
|---|---|
0 dB |
No adjustment — the device’s OS endpoint volume is left at its current level |
Lower than 0 dB |
Attenuates the input — the device’s OS endpoint volume is turned down |
Best practice: Where possible, adjust the microphone’s physical gain control. Use this slider for fine-tuning after physical controls are set. Watch the VU meter clip indicator — if it lights up, reduce the gain until it no longer clips at normal playing or speaking levels.
Clock Source and Drift Correction Options
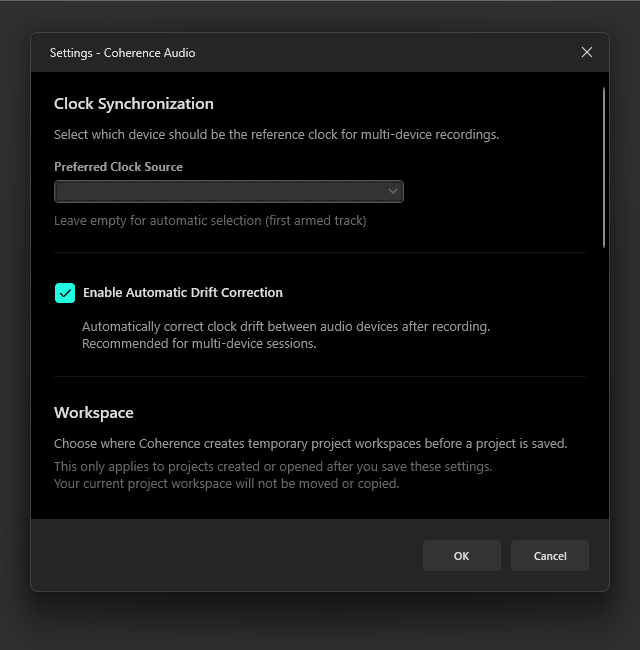
This section controls the Pro drift correction engine and designates the clock master device.
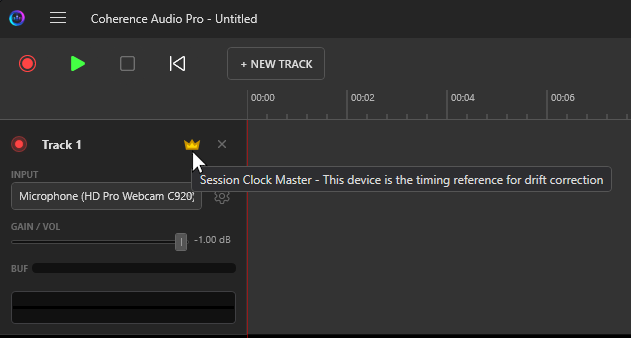
Clock Master
The Clock Master selector lets you designate which device should serve as the timing reference. All other devices will be drift-corrected relative to this device’s measured clock behavior.
Leave empty for automatic selection (first armed track). When no device is explicitly designated, Coherence Audio automatically uses the first armed track as the clock master. Designating a specific device is recommended when you want to ensure the most stable device is always used regardless of track order.
How to choose:
- Select the highest-quality, most stable device you have.
- If all devices are similar quality, prefer the device whose track is your primary reference (e.g., main vocal mic, kick drum mic, room reference mic).
- The clock master is indicated by a badge icon on its track row in the main window.
Enable Drift Correction
When checked, Coherence Audio Pro will apply drift correction after recording stops. When unchecked, tracks are left with no timing adjustment.
If you want to compare raw and corrected tracks after the fact, the simplest approach is to undo the drift correction step with Ctrl+Z — it is a distinct entry on the undo stack. Disabling the setting here prevents automatic correction from being applied during future recordings.
Drift Correction Scope
Coherence Audio Pro tracks each device’s clock behavior continuously throughout the recording, not just as a single start-to-end ratio. This means:
- Mid-session temperature changes that affect oscillator speed are tracked and corrected.
- Gradual drift rate variations over the course of a long session are accounted for.
- The correction is expressed in the master device’s time frame, so the output is self-consistent regardless of the master’s own absolute accuracy.
If the measured drift data for a device is inconsistent or contains impossible values (e.g., suggesting the device ran backwards in time, which would indicate a data problem rather than a real event), the correction engine falls back to a safe global constant-ratio correction for that device rather than applying a potentially incorrect time-varying correction. This fallback is logged in the session log files.
Log Files
Coherence Audio writes diagnostic logs for every session. If you need to investigate a problem or share details with support, the log files are located at:
%TEMP%\Coherence_Logs\
Two log files are created per session:
client-<timestamp>.log— the desktop application logserver-<timestamp>.log— the audio engine (host process) log
Logs for the 5 most recent sessions are retained; older logs are removed automatically on startup.
Workspace
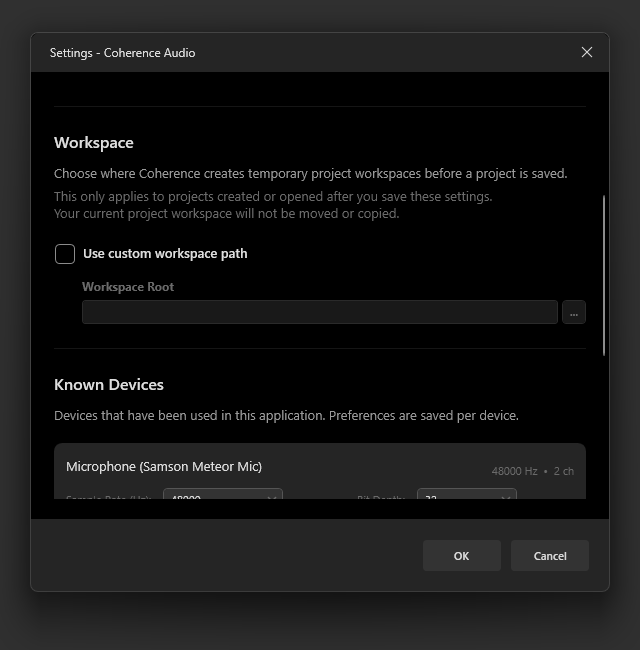
Workspace Path
The workspace path is the root directory where Coherence Audio creates temporary session folders during recording. When you start a new project, a unique session folder (Coherence_<guid>) is created inside this root to hold raw audio data while the session is active. When you save the project, all audio is imported into the .coh project file and the temporary folder is cleaned up.
Requirements for the workspace path:
| Requirement | Reason |
|---|---|
| Fast local drive (SSD preferred) | Multiple simultaneous write streams; slow storage causes drop-outs |
| Sufficient free space | At 32-bit Float / 48 kHz mono, budget ~660 MB per track per hour |
| Local path | Network drives (UNC paths, mapped drives) are not recommended; latency spikes cause buffer overruns |
| Write permissions | Coherence Audio must be able to create and write files in this folder |
Click Browse to open a folder picker, or type the path directly into the text field.
Settings Summary Table
| Setting | Default | Notes |
|---|---|---|
| Sample Rate | Device default | Match device’s native rate |
| Bit Depth | 24-bit PCM | 24-bit recommended for most work |
| Channels | Mono | Set to Stereo only for multi-channel devices |
| Buffer Size | 100 ms | WASAPI capture interval hint; ring buffer is fixed at 3 s |
| Latency Compensation | 0 ms | Only change if you have measured a specific offset |
| Input Gain | 0 dB | Prefer hardware gain control over software gain |
| Clock Master | (automatic — first armed track) | Designate a specific device to override automatic selection |
| Drift Correction | Enabled (Pro only) | Undo with Ctrl+Z to compare raw and corrected tracks |
| Workspace Path | (System temp) | Point to a fast local SSD |